
How to Calculate Correct Grip Length (With Real-World Examples)
When it comes to bolted flange joints, grip length is one of the most overlooked, but absolutely critical, factors for achieving proper preload, gasket compression, and joint integrity. In this post, we'll break down what grip length really means, why it matters, how to calculate it properly, and common mistakes to avoid. We'll also include real-world examples and a mention of the Velocity Washer where applicable.
What Is Grip Length?
Grip length is the total thickness of the components being clamped together by the bolt - excluding the nut, but including the flange faces, gasket, washers, and any spacers. It’s the distance the bolt has to “stretch” across to develop preload.
Think of grip length as the sandwich layers between the bolt head and nut. Get it wrong, and you're either bottoming out the nut, stripping threads, or failing to develop the clamp force you need.
Why Grip Length Matters
Incorrect grip length leads to incorrect tension. If the bolt is too short or too long relative to the grip, your preload suffers.
Thread engagement depends on it. Too much thread in the shear plane can cause fatigue; too little and you risk thread stripping.
Washers and accessories must be accounted for. Leave them out of your calculation and you’ll end up short.
Step-by-Step: How to Calculate Grip Length
Let’s walk through the process using a typical flange joint as an example.
1. Identify All Components in the Joint Stackup
Example flange joint:
Flange 1 thickness = 1.50 in
Flange 2 thickness = 1.50 in
Gasket = 0.125 in (compressed)
1 flat washer under nut = 0.125 in
Grip Length = Flange 1 + Flange 2 + Gasket + Washer
Grip = 1.50 + 1.50 + 0.125 + 0.125 = 3.25 inches
2. Select Stud Length Based on Grip and Engagement
A general rule for stud selection is:
Stud length = Grip + (2 x Diameter) (to allow for proper nut engagement)
For a 1-inch stud:
Stud Length = 3.25 + (2 x 1.00) = 5.25 inches
Round up to a standard 5.50" stud length to account for manufacturing tolerances.
3. Check Thread Engagement
You want 1x diameter of thread engagement minimum, preferably 1.5x. For a 1-inch stud:
Nut height = 0.875 in (standard heavy hex)
1.5x dia = 1.5 in minimum engagement
Make sure enough threads are exposed above the flange face to allow full nut engagement after tensioning. Watch out for washers and gaskets compressing under load.
Real-World Diagram
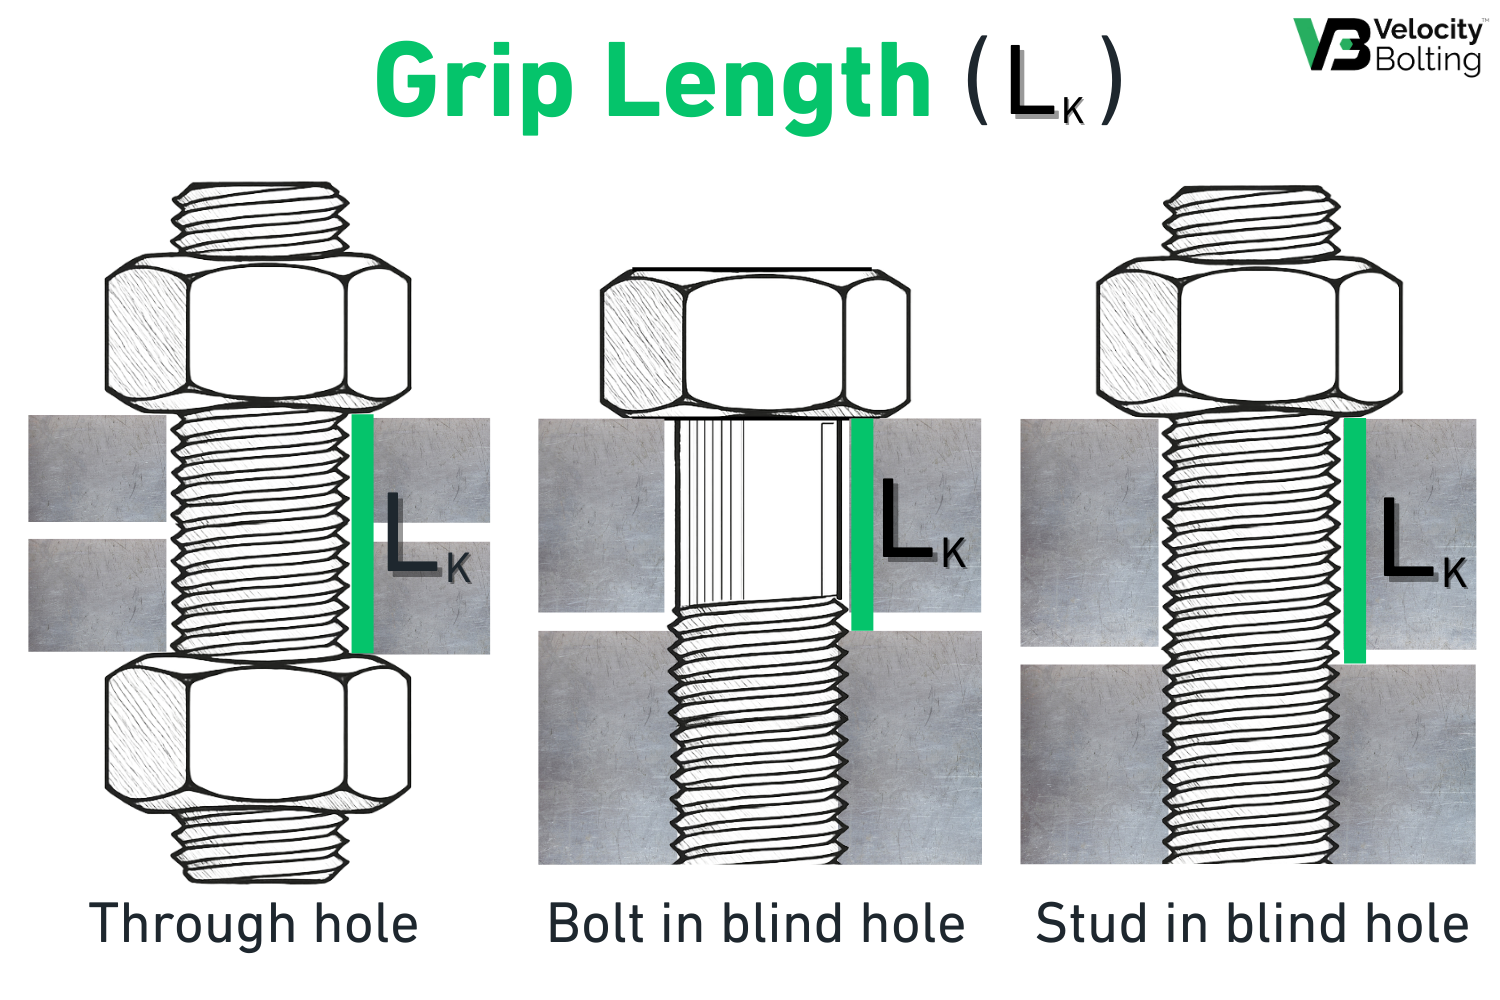
As you can see in the photo above, the sample calculation assumed a “through hole” scenario. You’d need to do different calculations if you’re dealing with a bolt or stud in a blind hole. In essence, you’d get rid of the “Flange 2” part of the above calculation.
Common Mistakes to Avoid
1. Ignoring Gasket Compression
If your gasket compresses significantly under load, your grip length shrinks—and so does your preload. Always use compressed gasket thickness.
2. Forgetting the Washer Stack
Using a standard hardened washer or Velocity Washer (AKA mechanical release washer) under a nut adds to your grip length. Forget it in your calcs, and your bolt might be too short.
3. Bottoming Out
If the nut runs out of threads before reaching the flange face, the bolt is too short. Preload will never develop.
4. Over-engaging Threads
Too much thread into the shear plane can lead to early fatigue failures. Don’t compensate for uncertainty by using extra-long studs.
The Velocity Washer Factor
If you're using a Velocity Washer under the nut, its height (usually between 0.38 - 0.72”) must be included in your grip length calculation. While it behaves like a hardened washer under load, its main benefit is during disassembly, when it releases preload instantly to prevent galling.
Including it in your calculation ensures you don’t undercut your stud length and compromise nut engagement.
Final Notes
Correct grip length isn't just a design spec - it's a field critical variable. If you're consistently having issues with bolts galling, under-loading, or being hard to remove, a wrong grip calculation might be the root cause.
Get the grip length right, and the joint stays tight.
For complex flange stacks or live plant applications, always validate grip length with a field measurement and visual thread count post-tightening. If in doubt, document your stack-up and do the math. Your preload - and your plant - will thank you.
Need help confirming grip length in a critical application? The team at Velocity Bolting has seen it all and can help you calculate, measure, and install with confidence.
______
Disclaimer:
Portions of this article were generated with the assistance of ChatGPT, a large language model developed by OpenAI. The content is provided for informational purposes only and does not constitute professional, legal, financial, or academic advice. The views expressed do not necessarily reflect those of the author, and readers are encouraged to independently verify any information presented.
The AI-generated content has been reviewed and edited for clarity and accuracy where appropriate.